NOTE:
This website is alive and growing.
Capture
How to enable the camera prewiew
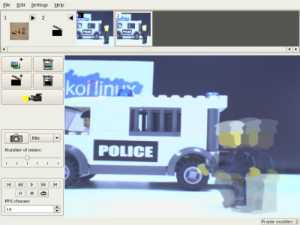
Stopmotion gives you the possibility to see a video signal as a tool to prepare your shooting.
![]() Press the videocamera button to enable the camera preview.
Press the videocamera button to enable the camera preview.
![]() Press the button again to disable the camera preview.
Press the button again to disable the camera preview.
TIP: Pay attention when working with kids. Do not leave the mouse pointer over the camera button or the camera can get disabled by mistake just by touching the mousepad. You get no warnings and might end up shooting the same picture again and again.
How to capture a frame
Once you are ready to take a picture, press the SPACE BAR key. A picture will appear on the timeline.
![]() This operation can be done also with the photocamera button.
This operation can be done also with the photocamera button.
A frame can be deleted from the timeline. Just select it wit a click and press the DEL key
or the Delete frames button. ![]()
You can delete several frames at once. To select several frames, click on the first one and SHIFT+click on the last one.
The deleting operation can be undone from the Edit->Undo menu, with the Undo button or with the CTRL+Z keyboard shortcut.
Shooting help tools
1. Onionskinning
Onionskinning is a feature allowing the layering of already captured frames over the current image. This feature is very useful and helps to be aware of the proceeding of your animation. To know more about onionskinning, see Wikipedia.
In Stopmotion onionskinning is a feature available only when the camera preview is on.
It has 3 different modes:
- MIX mode
It's the classic and most used mode. It adds last captured frames to your current preview. You can set the number of frames to add with the slider (from 1 to 5 frames).
- DIFF mode
It's useful for comparing with precision your last taken frame with your current preview (e.g. if you character fell and you need to put it back in place). Differences are coloured. The parts of the frames that are identical are black.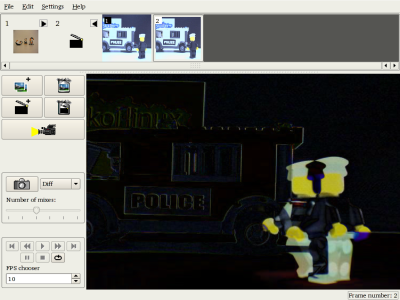
- PLAYBACK mode It plays back a certain number of captured frames adding the current preview as the last frame. It's useful for testing how the preview would be if captured. You can set the number of frames to playback with the slider (from 1 to 50 frames). You can set the speed of the playback in the FPS bottom area (from 1 frame per second to 30 frames per second).
Onionskinning is enabled by default, seto to mix mode with 2 frames added to the preview.
2. Motion path drawing
Have you ever wanted to mark the screen for a motion path or registration lines so to animate your character with more precision? Now you can! Here are two tools you can use:
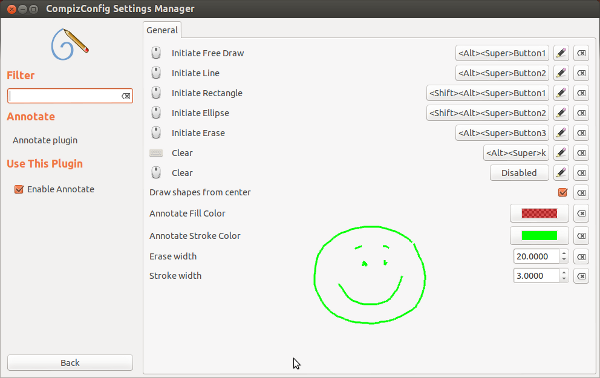
Compiz annotate
Compiz is a compositing window manager using 3D graphics hardware to create fast compositing desktop effects for window management. All effects can be added as plugins. The Annotate plugin allows you to free-hand write on the screen.
Install Compiz and its effect manager with the following terminal command:
sudo apt-get install compiz compizconfig-settings-manager
To enable the Annotate Compiz plugin launch the compizconfig-settings-manager. In the Extra category, enable Annotate. The application might ask you to enable also other necessary plugins like OpenGL or Composite.
Look carefully at the setting manager window for usage instructions.
Gromit
Gromit is a graphical tool to sketch and draw on your screen.
Install Gromit in the Ubuntu Software Center, with Synaptic or with the following terminal command:
sudo apt-get install gromit
Gromit works with keyboard shortcuts:
- Pause key (it's not the spacebar!): toggle painting.
Drag your mouse pointer around to make your sketches. Your mouse will be unavailable for other actions untill you press the Pause key again. - SHIFT-Pause: clear screen
- CTRL-Pause: toggle visibility
- ALT-Pause: Quit Gromit
You can configure Gromit behaviour. To know more see the README.
Unfortunately Gromits fails out of the box under Ubuntu 12.04
Playback
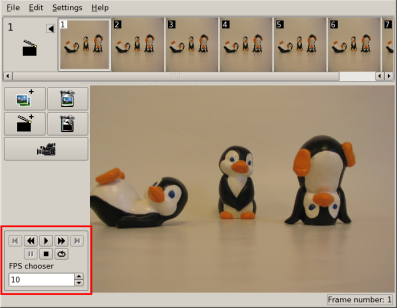
Stopmotion let's you playback your captured frames at different speed. Camera must be off.
Transport controls are available on the bottom part of the left panel. Mouse over them to get a tooltip of the function. You can:
- Play
- Pause
- Stop
- Move to next/previous frame
- Move to next/previous scene
- Loop the playback
You can set the speed of the playback using the FPS chooser (from 1 frame per second to 30 frames per second). The speed is useful for preview but it won't be saved with the project.
Scenes
Stopmotion stores your captured frames into a single scene. You can add a new scene with the Add scene button. ![]()
Scenes can be deleted with the Remove scene button. ![]()
WARNING: Deleting a scene gives you no confirmation message. The operation can't be undone. Be very careful and keep your mouse pointer away from that button to avoid unwanted deletion.
Working with more then one scene is a very basic feature that is good only for very basic animations. For more advanced projects it can be limiting, especially if you want your animation to have flexible framerate (e.g. a different speed for every scene). I always work having a single Stopmotion project for every scene. I never use multiple scenes in the same project.
Importing images from disk
Instead of capturing images from a live video stream, you can manually add pictures that are already on your disk.
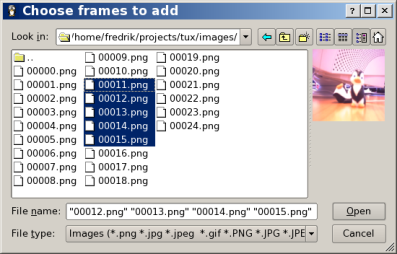
Click on the Add frames button to open the loading dialog. ![]()
Select a single image with a click. To select several images, click on the first image and SHIFT+click on the last image to load. Selected images will e loaded directly on the timeline.
Timelapse photography
Stopmotion can capture automatically at given intervals. This is particularly useful for timelapse video, that speeds up naturally slow actions. To know more about time-lapse photography consult Wikipedia
Automatic shooting can be enabled only when the camera preview is on. To enable it set the Onionskinning mode dropdown button to Auto.
The dropdown button below lets you set the unit time. It has 4 options:
- Off: shooting is off.
- Per second: set the unit time to seconds
- Per minute: set the unit time to minutes
- Per hour: set the unit time to hours
The slider lets you set the number of frames to be captured per unit time (from 1 to 10 frames).
How to save your animation
In Stopmotion saving can have 3 meanings:
Storing the captured pictures
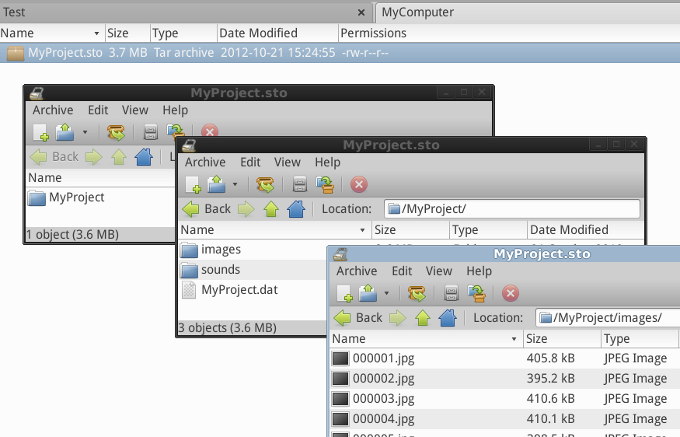
Stopmotion saves the captured pictures as .jpeg image files inside an images folder inside the project folder (the file with .sto extension).
To get to the captured frames, extract the .sto archive and enter the images folder.
If frames are manipulated with GIMP (see the Edit page) the images are stored in their new, modified version.
NOTE: If your archive manager application doesn't recognize the
.stoextension and complains "Archive type not supported", rename the.stoextension to.zipor to.tar.gz.
Storing editing decisions
Editing decisions refer to any modification on the timeline: add/remove scenes; delete, cut, copy, paste, duplicate frames; add sound.
These informations are stored in a .dat file, that is a lightweight text file containing instructions on how to build the animations.
This small file is accompanied by two much heavier folders named (for a reason) images and sounds.
Storing the animation as a video file
So far Stopmotion has only saved a project, that is made of the ingredients (images and sounds) and the recipe (our editing decisions).
This project can be played back only with Stopmotion.
If we want our animation masterpiece to be watchable outside Stopmotion we have to turn it into a proper single video file.
This process is called "Rendering" in Cinelerra and "Exporting" in Stopmotion. To know how to export from Stopmotion see the Export page.